


|
****************************************** INTO THE MAW****************************************** <----ROOM TACTICS---->by MackCatWhat do you do when someone says "Hey I want to RP, but dont know what to do", well thats simple put on your tighty whiteys, get your character that you love to RP with and tell them that they have nothing to fear, because Im hear to RP with you . . . Well okay maybe not that exactly,but the Council and Admin are here to RP with you if were in an RP and you pop on youre more than welcome to join us, unless of course its a "specific role RP" which doesnt happen very often. But still if you want to do something and arent quite sure what to do seriously, just ask a Council/Admin person to RP with and we will be more than happy to help you and perhaps get you your own RP to flow from that and allow others to help. Okay so thats it in a nutshell, right, wrong . . . remember when I said a while back that RP is what you make of it, well youre always welcome to start your own RP if you cant think of one that you want to join, something that tickles your fancy and if you want you can always ask or seek the Council's help and well be more than willing to help you out, get something started and of course get you through it. But you will need to have a start, middle and end on your own we cant do everything . . . well some often can, but thats debatable at this point. So now you have two options of RP again feel free to RP with anyone thats a Council/Admin in the room or start your own thing, bet you didnt think that you could do that could you, well now you and knowing is 1/4 of the battle, the other 3/4 is you actually just doing it . . . like we do. Remember RP is about having fun so make sure that you have fun for yourself, and make it fun for the others. The more the merrier and thats what the RP is all about and this room too . . . ask anyone and theyll tell you . . . or Ill THWAP them!. Thanks for reading, see you soon. ****************************************** <----A TINGE OF BEAUTY---->---PSP/PS TUTORIALS---By DotYou can make this as big or small as you wish, smaller ones are a little harder to work with at first. You can even use this to create buttons and icons! I start with a document that is 468 w by 60 h. I then choose the rounded retangle tool. (to get that go down to rectangle tool, hold it down then select the second one from the top.) Now make your rounded rectangle...you can move it using the move tool ( crl + v ). Now go into your layer blending options and select the gradient overlay. I'm using the first gradient in the pulldown. Rasterize the vector mask, then rasterize the layer (right click on the layer). Now duplicate that layer. Now on the duplicated layer go into your blending options again and select Color Overlay, set the color to white and the opacity to 50%. Now with the marquee tool select the lower half of the rectangle on the duplicated layer and delete it. Now you should have a whiteish half and a half in the gradient color you chose. Change your Marquee to the circular one, then make a selection under your white portion of rectangle. Move the selection to be halfway between the two. Right click and select feather, put in 10 pixels, and hit delete. You won't notice a big change, but there is one! 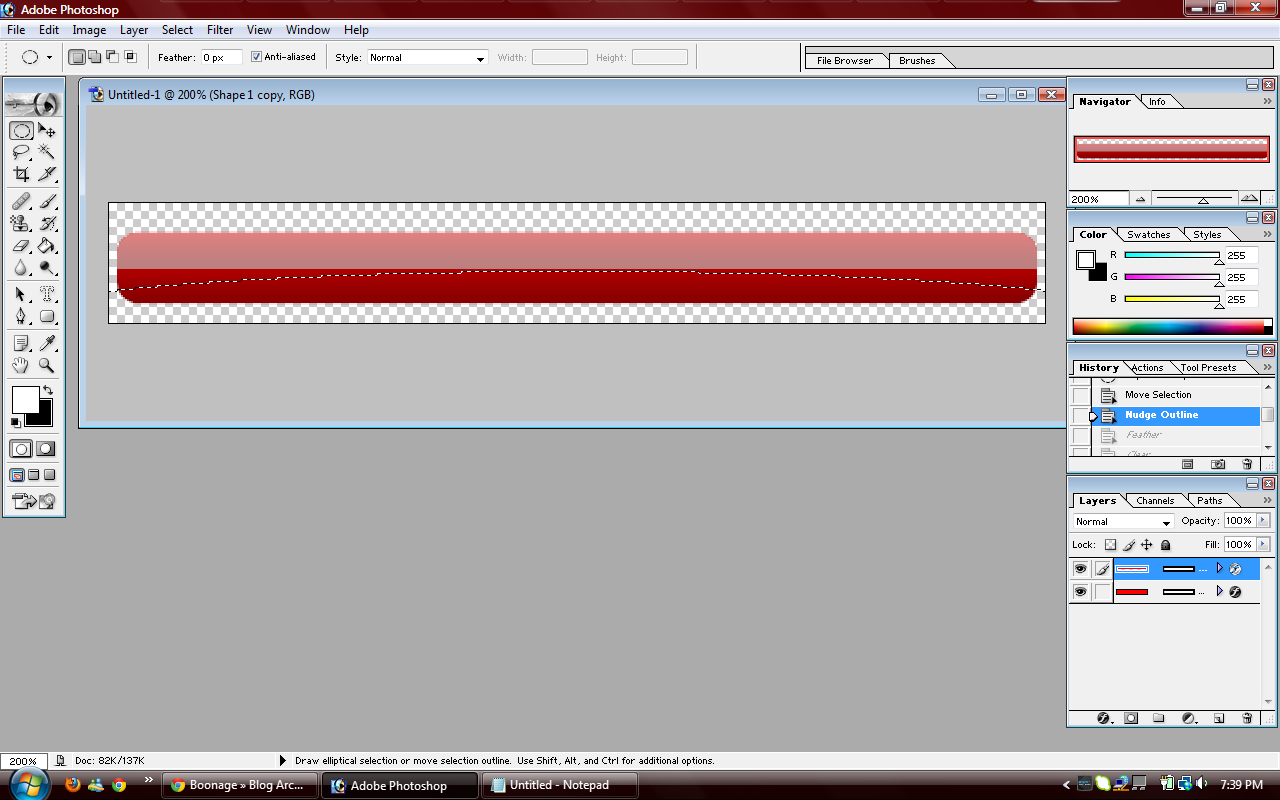 Holding control, click on your first layer...Mine is red, so I click on my red layer. Now go to Select>Modify>Expand in the box put in 1 and hit okay. Now you have a little selection around your orginal one...Make a new layer and drag it under the the orginal. With "Layer 1" highlighted, use your paint bucket and fill with White. If you don't notice any difference make another layer.."Layer 2", put it under "Layer 1", and fill it with black. With "Layer 1" selected, use the circle marquee to make another section at about halfway, feather this just like you had the white layer at 10 pixels. Now hit delete ONCE. Repeat Step 7 but at the top. Control + left click on the original layer, select>modify>expand and type in 2, put a new layer between "Layer 1" and "Layer 2". This layer will be filled with black and be the frame. On a new layer, that's on top of everything put in your name, or the name of others. Use the style of your choice (double click the layer, select styles, then select the little icon of your choice with no drop shadow). Now click the little eye on "Layer 2"; this makes it go away, remember to save as a PNG, this will make it transparent and have the background of the boards or room!  Adapted from COOL GLASSY ICON CREATIONS For more glass affects GLASS-EFFECT ****************************************** <----CULINARY COOK (Recipes)---->By Mouse****************************************** ****************************************** 8 Fun Ways to Manage Stess 1. Reduce Stress
with Touching, Kissing, Hugging Touching, kissing, and
hugging (or any other affectionate activities)
are activities that stimulate the brains
release of the hormone oxytocin. If you want to
take it up a notch, get a room! Recent studies
reveal that the surge of oxytocin released
during orgasm can lower blood pressure, calm
nerves and tame tension. In fact, according to
the British Medical Journal, sex is so good for
your heart that it cuts your risk of heart
attack and stroke in half when performed three
times a week. 2. Reduce Stress
by Swearing it Off! Swearing has been shown
to minimize stress and increase workplace
camaraderie. Thats according to scientists at
East Anglia Norwich University in England 3. Reduce Stress
by Eating Garlic The main ingredient in
garlic when digested is organosulfur allicin,
which triggers your body to produce hydrogen
sulfide. The combo creates an internal reaction
that relaxes blood vessels and encourages blood
flow. Translation: garlic is good for your heart
and your head and helps manage stress. 4. Reduce Stress
by Eating Chocolate Balance isnt just for
yoga. In fact, a little bit of chocolate can go
a long way when it comes to your diet. Dark
chocolate has been shown to be filled with
antioxidant flavonoids (which can minimize your
risk of heart disease and reduce blood
pressure). Some scientists have gone so far as
to claim that the sweet stuff has more
flavonoids than any other food (including
blueberries). According to research published in
Proceedings of the National Academy of Sciences,
those said flavonoids help blood vessels relax,
helping calm overall stress. Word to the wise,
choose the lower fat dark chocolate to milk
chocolate. It has a higher count of the good
stuff. And of course opt for organic chocolate. A Few Organic
Chocolate Options to Salivate Over: 5. Reduce Stress by
Rubbing your Hoku Your hoku is that flap of
skin on your palm that connects your pointer finger
to your thumb. Its also an acupressure spot related
to upper body tension that, when squeezed, can
minimize stress by up to 39 percentthats according
to scientists at Hong Kong Polytechnic University. 6. Reduce Stress by
Watching YouTube Laughter is a proven way to
ease stress. Even the mere anticipation of something
funny has the ability to calm us down thanks to the
release of stress hormones like dopac, cortisol and
epinephrine. More than easing angst, short funny
film clips have been proven to increase blood flow
to the heart according to scientists at the
University of Maryland. 7. Reduce Stress by
Gardening Research has shown that
having plants and flowers in your presence can
elicit a positive mood and reduce stress levels.
Connecting with the Earth by sticking your hands in
the dirt and tending to the plants yourself even
further imbue you with an energy of calm. 8. Reduce Stress by
Embracing Clutter For years, neat-freak moms
have been insisting on orderly bedrooms for the sake
of productivity, sanity, and just seemingly to
pester. Not anymore! Eric Abrahamson (a Columbia
School of Business Professor) and David H. Freedman
(a journalist) have found that moderate messes can
actually enrich creativity and minimize anxiety. ALWAYS
ALWAYS
.ALWAYS
.try to end every situation
with a positive thought. Even if the only positive you can come up with is the
fact that something bad happened but now it is over with. |